Affiliate Manager
How to Add Affiliates in the Affiliate Manager
Affiliates are individuals or businesses that promote your products or services and earn commissions based on the sales or leads they generate. Using unique affiliate links, they track their promotions and are commonly referred to as "affiliate marketers" or "publishers.
Here are four simple ways to add and manage affiliates in your Affiliate Manager
1. Add New Affiliate Manually
Go to the Affiliate Manager page and click the "Add" button.
Choose "New Affiliate" from the options.
Enter the affiliate's details (Email, First Name, Last Name) and assign them to a campaign.
Click "Save" to finalize the addition.
2. Upload Affiliates in Bulk
Navigate to the Affiliate page and click "Add".
Select "Upload Affiliate" from the dropdown menu.
Download the sample CSV file and populate it with your affiliate data.
Note: First Name, Last Name, and Email are required fields for importing an affiliate.
Upload the completed file and click "Save" to add them in bulk.
3. Import Affiliates from Contacts
On the Affiliate page, click "Add" and select "Import from Contacts".
Choose the contacts from your list that you want to convert into affiliates.
Click "Import" to add them to your affiliate program.
4. Automate Management with Workflows
You can automatically add, remove, and update affiliates using workflow actions. The following actions are available:
Add to Affiliate Manager: Automatically adds a contact to the Affiliate Manager with an active status.
Update Affiliate: Change the status of an affiliate to either active or inactive.
Add to Affiliate Campaign: Adds an affiliate to a specific campaign from the Campaigns tab.
Remove from Affiliate Campaign: Removes an affiliate from an existing campaign.
Adding Sub-Affiliates in the Affiliate Manager
Sub-affiliates are affiliates who work under a parent affiliate. They promote products or services through their own networks, and the parent affiliate earns a commission from the sales made by their sub-affiliates. This model helps affiliates expand their networks and increase their earnings.
Our platform supports up to 7-tier affiliate campaigns, allowing affiliates to have multiple sub-affiliates under them.
Please Note: The campaign you want to add sub-affiliates to must be multi-tier (tier 2 or above).
1. Add Sub-Affiliates Manually
Manually adding sub-affiliates allows for greater control over who joins a campaign.
Navigate to the Affiliate Page: Go to the Affiliate Manager under the Marketing section.
Select an Affiliate: Click on the parent affiliate you want to add sub-affiliates under.
Switch to Sub-Affiliate Tab: On the affiliate's profile page, scroll down and click on the "Sub-Affiliate" tab.
Add Sub-Affiliate: Click the "Add Sub-Affiliate" button.
Choose Campaign: Select the desired multi-tier campaign from the dropdown menu.
Select Sub-Affiliates to Add:. Choose existing affiliates from the list to add as sub-affiliates. If the affiliate is not already on your list, you can click "+ Add Affiliate" to create a new affiliate profile.
2. Auto-Enroll New Customers as Sub-Affiliates
This option allows you to automatically enroll new customers as sub-affiliates under the affiliate who referred them after a successful sale.
Go to the Affiliate Manager: Navigate to the affiliate manager from the main menu.</li>
Edit a Campaign: Open an existing campaign or create a new one.</li>
Expand Additional Settings: In the campaign setup, proceed to the final step and expand the "Additional Settings" section.</li>
Toggle Auto-Enroll: Turn on the toggle for "Auto Enroll New Customers as Sub-Affiliate".</li>
Save and Publish: Save and publish the changes to the campaign
You can also enable or disable this setting globally in the Global Settings section of the Affiliate Manager. This will apply to all future campaigns.
3. Allow Affiliates to Recruit Their Own Sub-Affiliates
Affiliates can recruit sub-affiliates themselves by sharing a sign-up link. This process makes onboarding easy and gives affiliates more autonomy.
Edit a Campaign: When creating or editing a campaign, go to the last step and click on "Additional Settings".
Toggle Sign-Up Page: Toggle on the "Sub-Affiliate Sign-Up Page" option.
Select the Form: From the dropdown, select the form you want to use for sub-affiliate sign-ups.
Save Changes: Click "Finish" to save the changes.
Affiliates will now see a sign-up link in their affiliate portal, which they can share to recruit sub-affiliates.
Forms used for sub-affiliate sign-ups must include First Name, Last Name, and Email. Missing fields will result in errors.
The Sub-Affiliate Sign-Up feature only works for multi-tier campaigns (tier 2 or higher)
How to Use the Affiliate Portal
The Affiliate Portal (also referred to as the Client Portal) is a dedicated platform designed to help affiliates easily track and manage their performance, commissions, payouts, and customer interactions. This user-friendly and secure interface fosters better communication and streamlined operations between your business and its affiliates.
Adding Affiliates to a Campaign
Once an affiliate is added to an active campaign, they will receive an invitation email to access the Affiliate Portal. Ensure that the "Invite Email" option is toggled on in the campaign settings. You can also automate welcome emails or SMS messages with details on how affiliates can get started.
Affiliate Login
Affiliates can log in using the credentials provided in their invitation email. Once inside, they will be directed to the Affiliate Dashboard where they can view their campaign data and affiliate links.
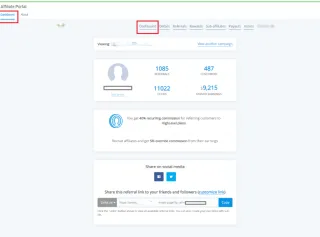
What Affiliates Can See in the Portal
Affiliates can view all the campaigns they are part of and see key metrics such as leads, customers, clicks, and commissions. They also have quick access to their referral links.
The screen provides detailed insights into the leads and customers who signed up or purchased a product through the affiliate's referral links, allowing them to track the effectiveness of their promotional efforts.
Affiliates can view the commissions they've earned, the total revenue generated, and the status of their payouts.
Sub-Affiliate Page: If the affiliate program includes sub-affiliates, the affiliate can see their sub-affiliates listed here. If sub-affiliate sign-up is enabled, affiliates will also see a form URL they can share to onboard others as sub-affiliates.
Configuring the Affiliate Portal - Where to Find Affiliate Portal
Navigate to <strong>Affiliate Manager</strong> from the left-hand menu of your sub-account.
Click on the <strong>Settings</strong> tab at the top.
Switch to the Affiliate Portal Settings
What You Can Configure
Ask Affiliates to Upload W9/W8 Forms: Displays a banner prompting them to upload required tax forms, ensuring tax compliance and preventing payout delays.
Require Affiliates to Set Up a Payout Method: Shows a banner nudging them to set up a valid payout method (e.g., PayPal or Banks) to enable timely payouts.
Mask Referral Emails on Affiliate Dashboard: Hides a portion of referral emails (e.g., john****@gmail.com) to protect customer and lead privacy.
Configure Payout Methods: Lets you choose which payout methods are available for affiliates to select, giving you control over how commissions are paid out.
How to Enable or Disable a Setting
In the Affiliate Portal Settings tab, locate the toggle you want to change.
Click the toggle to enable (green) or disable (gray) it.
Once you've adjusted your settings, scroll to the bottom and click Save
Best Practices
Always enable at least one payout method to avoid affiliate confusion.
Use email masking if your campaigns are sensitive or you want to limit affiliate access to full lead details.
Navigating the Affiliate Profile Page
The Affiliate Profile Page provides a comprehensive view of affiliate performance, allowing users to manage and track affiliate activities from one centralized location. This page helps streamline affiliate management by offering access to key details, stats, and tools.
1. Affiliate Details
Displays crucial information such as the affiliate's email, join date, and their parent affiliate (if applicable).
Includes a magic link that gives quick, one-click access to the affiliate's portal.
2. Affiliate Stats
Get a snapshot of the affiliate's performance with metrics like:
Revenue Generated: Total revenue brought in by the affiliate.
Owed Payouts: Commissions earned but not yet paid.
Number of Leads: Total leads generated.
New Customers: Number of new customers referred.
3. Campaign Insights
Gain a clear view of an affiliate's involvement across various campaigns.
See summary metrics for commissions earned and payouts received.
Use filters to view data by individual campaigns or get an aggregate summary.
Toggle between active, deleted, and inactive campaigns to see a complete history.
4. Direct Campaign Assignment
Assign the affiliate to new campaigns directly from the profile page, streamlining campaign management without needing to navigate away.
5. Active Referral Links
View all active referral links for the affiliate across all their assigned campaigns.
Customize referral IDs for specific campaigns to create personalized, easy-to-remember links.
6. Commissions Tab
Manage all aspects of affiliate commissions from a single tab.
Quickly Approve or Deny pending commissions.
Add commissions manually for an affiliate when necessary, such as for offline sales or special bonuses.
7. Leads Tab
Review all leads attributed to the affiliate.
Delete leads as needed to maintain a clean and accurate list.
Manually add new leads to the affiliate's list for greater control and accurate tracking.
8. Customers Tab
Access a complete list of customers referred by the affiliate, along with their detailed commission history. This helps in understanding customer value and affiliate performance.
9. Payouts Tab
Track all affiliate payouts with powerful filters for easy tracking and accountability. You can filter by payout status (e.g., pending, approved, completed) to manage payments efficiently.
10. Sub-Affiliate List
Display all sub-affiliates associated with the selected affiliate. This provides valuable insight into the affiliate's network structure and recruitment success in multi-tier campaigns.
Quick Campaign Actions
Easily manage affiliate assignments, add, remove, suspend, or move affiliates between campaigns without opening their profiles using Quick Campaign Actions.
Step 1: Adding Affiliates to a Campaign
Click on Campaign Actions → Add to Campaign
Choose the campaign from the pop-up list
Removing an Affiliate from a Campaign
Select Campaign Actions → Remove from Campaign
Pick the campaign from which you want to remove the affiliate
Suspending / Unsuspending an Affiliate from a Campaign
Campaign Actions → Suspend Affiliate
Choose the campaign you'd like to suspend them from
To Unsuspend, follow the same steps. While suspended:
You cannot manually add leads, assign commissions, or import past activity for the affiliate
Suspending will stop all tracking — including clicks, customers, and both new and existing sales
The affiliate will also lose access to campaign links and details on their portal while suspended
Once unsuspended: The affiliate's existing links will start working again automatically
Moving an Affiliate to another Campaign
From the Campaign Actions menu, choose "Move to Campaign"
Select the campaign where you want to move the affiliate
Decide what to do with existing customers - choose from two options:
Keep them in the old campaign: Existing customers and their recurring commissions will stay under the current campaign
Move them to the new campaign: Future commissions from existing customers will now follow the new campaign's rules
Choose whether to send the welcome email (if the target campaign has welcome emails disabled, no email will be sent even if this is turned on)
Click "Move Affiliate" to complete the action
FAQs
Q: Can I undo a "Move to Campaign" action?
No, but you can manually reverse it by moving back.
Q: Will affiliates get email notifications when moved or suspended?
Welcome emails depend on campaign settings and the toggle during the Move flow.
Q: Can I bulk-manage Quick Campaign Actions?
Not via Quick Actions—use workflows or manual bulk routines instead.
Q: Does suspending affect referral links?
Yes, while suspended, links don't track; once unsuspended, links auto-reactivate.
How to Create an Affiliate Campaign
Creating your affiliate campaign has never been easier! Whether you're new to affiliate marketing or a seasoned pro, our platform simplifies the process with its multi-tier support, customizable commissions, direct affiliate assignments, and more. Follow this guide to get your campaign up and running and start earning commissions with just a few clicks.
Step 1: Start by Clicking the "Add" Button
Navigate to the Campaign page and click the "+ Add" button to initiate the creation of your campaign
Step 2: Choose Your Campaign Source
Select the source for your campaign, such as a funnel, website, or store where your products are listed.
Step 3: Configure Source Details
You can also choose the landing page where potential customers will land. Once set, the system will generate a default campaign URL. This URL includes a unique affiliate link, where the placeholder <affiliate_id> is automatically replaced with each affiliate's unique ID.
Please Note: Currently, only funnels, websites, and stores support product sales via affiliate campaigns. However, you can also track leads and pay affiliates for generating leads through forms, surveys, and calendars. Learn more here. Landing page selection is just used to set where the potentials customers will land. Please note that tracking will be done source wide not just on the landing page
Step 4: Review Your Product List
Review the products associated with your selected source. Add or remove products to ensure that only commission-eligible items are listed.
Step 5: Set Default Commission
Establish a default commission for your campaign, choosing either a flat fee or a percentage of the product price.
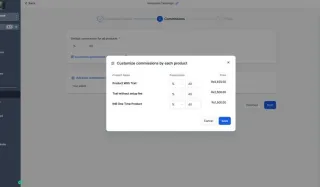
Step 6: Customise Product Level Commissions (Optional)
Optionally, set specific commissions at the product level to tailor payouts based on individual product prices.
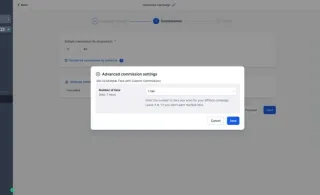
Step 7: Enable Multi-Tier Commissions
Access the Advanced Commissions settings to enable multi-tier commissions. You can support up to 7 tiers for more intricate commission structures.
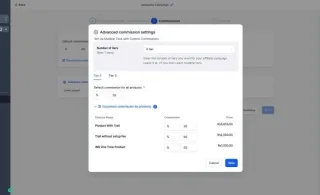
Step 8: Configure Tier-Specific Commissions
Assign commissions to each tier by either applying the default rate or customizing them for each level based on performance.
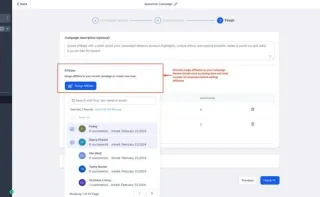
Step 9: Add a Campaign Description (Optional)
Add a campaign description that outlines its purpose to make it more attractive to potential affiliates.

Step 10: Assign Affiliates Directly
Review affiliate details, such as their join date and total affiliate count, before directly assigning them to your campaign.
Step 11: Adjust Additional Settings
Tailor your campaign further with options such as:
1. Email templates for affiliate onboarding
2. Cookie duration for tracking affiliate activity
3. Payout terms
4. Including setup fees in commission calculations
5. Enabling sub-affiliate signups
6. Auto-enrolling new customers as sub-affiliates

How to add Manual Sales
Key Use Case for Manual Sales
This feature is perfect for handling sales that happen outside of your standard online tracking. It gives you full control to ensure every affiliate is rewarded for the sales they influence, no matter how the sale was made.
Offline Sales: Credit affiliates for sales they generate at in-person events, conferences, or through other offline marketing campaigns where a link can't be clicked.
Untracked Sales: Easily assign a sale to the correct affiliate when a customer forgets to use their referral link but you have confirmation of who referred them.
Customer Referrals: Reward affiliates for powerful word-of-mouth recommendations that result in a sale, even if no link was ever involved in the process.
Method 1: Attributing an Existing Transaction
Use this method when a transaction is already recorded in your system (for example, a Stripe payment) but was not correctly linked to an affiliate at the time of purchase.
1. Access the Affiliate's Profile: Navigate to the Affiliate Manager and select the specific affiliate you wish to credit for the sale.
2. Navigate to Commissions: Within the affiliate's profile page, click on the Commissions tab to view their commission history.
3. Import a Transaction: Click the "Add Sales Manually" button and, from the dropdown menu, select the option to "Import Existing Transaction."
4. Find the Customer: In the pop-up window, enter the customer's email address and select the affiliate campaign that the sale should be attributed to.
5. Select the Transaction: The system will display a list of transactions associated with that customer. Review the list and select the checkbox next to the specific transaction you want to attribute to the affiliate.
6. Confirm and Submit: Once you have selected the correct transaction, click "Submit" to finalize the process. The commission will now be generated and appear in the affiliate's commission list.
Method 2: Creating a New Transaction (for Offline Sales)
Use this method when a transaction is already recorded in your system (for example, a Stripe payment) but was not correctly linked to an affiliate at the time of purchase.
1. Access the Affiliate's Profile: Navigate to the Affiliate Manager and select the specific affiliate you wish to credit for the sale.
2. Navigate to Commissions: Within the affiliate's profile page, click on the Commissions tab to view their commission history.
3. Import a Transaction: Click the "Add Sales Manually" button and, from the dropdown menu, select the option to "Import Existing Transaction."
4. Find the Customer: In the pop-up window, enter the customer's email address and select the affiliate campaign that the sale should be attributed to.
5. Select the Transaction: The system will display a list of transactions associated with that customer. Review the list and select the checkbox next to the specific transaction you want to attribute to the affiliate.
6. Confirm and Submit: Once you have selected the correct transaction, click "Submit" to finalize the process. The commission will now be generated and appear in the affiliate's commission list.
Method 3: Automating Manual Sales with Workflows
For recurring or batch processes, you can automate manual sale attribution using workflows, which is perfect for scaling your affiliate program.
Add the Workflow Action: Inside a workflow, add a new action and select "Add Manual Sales For An Affiliate."
Configure Attribution: You can choose how the sale is attributed:
Auto-Track via Attribution: This powerful option automatically assigns the sale to the affiliate whose ID is present in the contact's URL, eliminating the need for complex "if/else" branches in your workflow.
First or Latest Attribution: If not using auto-track, you can attribute the sale based on the contact's first-ever affiliate interaction or their most recent one.
Set Sale Details: Select the affiliate campaign and enter the revenue details. This revenue amount can be a fixed value or a dynamic value pulled from a form submission or a custom field.
Save the Workflow: Once configured, save and publish the workflow. It will now automatically handle manual sales attribution whenever a contact passes through that step.
Benefits of Manual Sale attribution
Manually attributing sales provides several key advantages for a robust and fair affiliate program.
Flexibility: It gives you the power to attribute sales from any source, including offline channels and other non-traditional platforms where link tracking isn't possible.
Accuracy: It ensures that all affiliate-driven sales are properly tracked and credited, which builds trust and motivation within your affiliate network.
Custom Tracking: You can attribute sales to affiliates even when no standard tracking links were used, making sure that every referral is accounted for.
Affiliate Manager Dashboard
The Affiliate Manager Dashboard is designed to streamline your affiliate management tasks, providing you with essential metrics and insights to optimize your campaigns effectively.
Quick CTAs (Call To Actions)
Easily create new campaigns or add affiliates directly from the dashboard by clicking the "New" button.
Campaign Picker
Select "All Campaigns" for a comprehensive overview or choose specific campaigns from the dropdown to focus on particular insights.
Core Metrics
Track essential metrics like Total Revenue, Total Customers, and Conversion Percentage to gauge your campaign's performance at a glance.
Conversion Trend
Analyze the Conversion Trend line graph to view lead and customer trends over time, helping you understand how your campaigns are performing and identify patterns.
Affiliate Leaderboard
Monitor your top 10 affiliates based on various criteria such as revenue, commissions, leads, or customers. This helps you recognize and reward high-performing affiliates.
Pending Actions
Quickly view pending payouts and commissions. Click on "Pending Payouts" to navigate directly to the payouts page and manage pending actions efficiently.
Latest Updates
Keep up with the latest additions of affiliates and recent commissions. Use the dashboard to approve or deny commissions and stay updated with all important details.
Export Sales CSV
You can now download affiliate sales data directly from the Affiliate Manager Dashboard in CSV format. Get a clear, exportable view of your affiliate activity and performance, all in one file. The CSV includes the following fields: Campaign Name, Affiliate ID, Affiliate Name, Affiliate Email, Customer Email, Customer Name, Transaction Date, Revenue, Commission, Currency and Status
Affiliate Level Commissions
Managing affiliate commissions effectively is key to motivating affiliates and driving the success of your program. The Affiliate-Level Commission Settings feature allows you to set custom commission rates for individual affiliates within a campaign. This offers a flexible, targeted approach to commission management, letting you reward top performers by overriding default campaign-level settings.
Key Features & Use Cases
With Affiliate-Level Commission Settings, you can:
Set Custom Commission Rates: Override the default campaign commission for individual affiliates.
Manage Tiered Commissions: Adjust commission rates for multi-tiered campaigns.
Example Use Case
Let's say your default campaign offers a 40% commission to all affiliates. However, you have an affiliate who consistently drives high-value sales. Using this feature, you can easily set a 50% commission for that specific affiliate without changing the overall campaign settings, allowing you to reward their exceptional performance.
How to Set Custom Affiliate Commissions
This feature ensures precise control over commission payouts, helping you boost performance and keep your affiliates motivated.
Key Features & Use Cases
With Affiliate-Level Commission Settings, you can:
Set Custom Commission Rates: Override the default campaign commission for individual affiliates.
Manage Tiered Commissions: Adjust commission rates for multi-tiered campaigns.
Reward High Performers: Offer higher commissions to top-performing affiliates without affecting the rest of the campaign
Let’s say your default campaign offers a 40% commission to all affiliates. However, you have an affiliate who consistently drives high-value sales, and you want to offer them a higher rate. Using this feature, you can easily set a 50% commission for that affiliate without changing the overall campaign settings, allowing you to reward their exceptional performance.
Steps to Configure Affiliate-Level Commission Settings
Step 1: Navigate to the Sub Account Affiliate Manager Log in to your CRM and go to the Sub Account Affiliate Manager section.
Step 2: Select the Affiliate Find and select the affiliate for whom you want to set a custom commission rate. This will take you to the affiliate's profile page.
Step 3: Choose the Campaign Scroll down to the Active Referral Link section and click Customize next to the campaign where you want to adjust the commission settings.
Step 4: Configure Affiliate-Level Commissions Switch to the Commissions tab. Enter the custom commission rate for that affiliate. If the campaign is multi-tiered, configure the commission rates for each tier. You can adjust both Default Commissions and Product-Based Commissions as needed.
Precedence: Affiliate-level commission settings always take priority over campaign-level settings during commission calculations.
Tier Management: Tiers cannot be changed within the affiliate profile settings. To adjust tiers, you must modify the campaign settings.
Support: Currently, this feature is supported only for affiliate campaigns where the source is a funnel or website.
This feature ensures that you can offer customized incentives, ensuring your top performers remain engaged and motivated. By managing commissions at an affiliate level, you can fine-tune your reward system without affecting your overall campaign structure.
How To Track Affiliate Sales Using Coupons
Whizrock enables you to effectively track your affiliates and influencers through referral links and coupon codes. Coupon codes are particularly useful in scenarios where referral links aren't viable, such as on platforms like Instagram.
Benefits of Coupon Code Tracking
Discount Flexibility: Offer discounts or special promotions to affiliates’ followers.
Customizable Discounts: Set coupon codes from 0% to 100% off, allowing for both full-price sales and free services.
How to Set Up and Use Coupon Codes
Access the Affiliate Manager:
Navigate to Marketing > Affiliate Manager.
Select the Affiliate:
In the Affiliate/Promoter module, locate and select the specific affiliate you want to set up coupon codes for.
Customize the Campaign:
Scroll down to the "Active Referral Links" section. Here, you’ll see a list of campaigns and the affiliate’s URL.
For the desired campaign, click on Customize.
Configure the Coupon:
Switch to the Coupon tab.
Choose the coupon type: Percentage or Fixed.
Enter a user-friendly coupon name.
Click on Generate Code to create your coupon code.
Set the Discount:
For a free service, set the discount to 100%.
For a specific discount, set the percentage from 0% to 100%. (Note: A 0% discount is used solely for tracking purposes.)
Save and Manage:
Click Save to finalize the coupon code.
You can also edit or manage existing coupon codes within the same pop-up window.
Important Notes
Ensure the coupon code is user-friendly and easy for your affiliates to share with their audience.
Regularly review and update coupon codes to align with your promotional strategies.
By following these steps, you can effectively track and manage affiliate activities using coupon codes, enhancing your promotional efforts and optimizing affiliate performance.